Welcome to the IBM Websphere Commerce Hub


Welcome to the IBM Websphere Commerce Hub

Come join me in my journey to explore the various features and capabilities of IBM Websphere Commerce and understand how retailers can benefit from its really cool out-of-box functionality.

Showing posts with label management center. Show all posts

Thursday, July 25, 2013

Spell Checker in Management Center

You can customize the Spell check feature within the Management Center by adding in new words to the dictionary. Please note that with WCS - new dictionary cannot be created though.

To add words to the Management Center spell check dictionary, create <word> elements as children of the root <dictionary>  element of the file     LOBTools > WebContent > WEB-INF > dictionaries >addenda.xml using the below guidelines and restart the server.
      
SAMPLE:
        <word>sampleword1</word>
        <word>sampleword2</word>
        <word locale="de-DE" >sampleword3</word>
        <word locale="en-US" >sampleword4</word>
        <word locale="en-US,fr-FR" >sampleword5</word>
        <word locale="en-US,fr-FR,it-IT,">sampleword6</word>

Specify a comma separated list of locales in the locale attribute to indicate the languages for which each word is available.

If the locale attribute is not specified, the word will be available for all languages.

The following locales can be specified:
                  
  Language - Country/Region       Locale code
        Afrikaans - South Africa        af-ZA
        Arabic                          ar-XX
        Catalan                         ca-CT
        Czech - Czech Republic          cs-CZ
        Danish - Denmark                da-DK
        German - Switzerland            de-CH
        German (Germany)                de-DE
        Greek - Greece                  el-GR
        English - Australia             en-AU
        English - United Kingdom        en-GB
        English (US)                    en-US
        Spanish (Spain)                 es-ES
        French - Canada                 fr-CA
        French (France)                 fr-FR
        Italian (Italy)                 it-IT
        Norwegian (Bokmal) - Norway     nb-NO
        Dutch - The Netherlands         nl-NL
        Norwegian (Nynorsk) - Norway    nn-NO
        Polish (Poland)                 pl-PL
        Portuguese (Brazil)             pt-BR
        Portuguese - Portugal           pt-PT
        Russian (Russia)                ru-RU
        Swedish - Sweden                sv-SE

Monday, June 3, 2013

Tutorial : E-mail Templates & Custom Placeholders

E-mail templates define the structure and content of marketing e-mails that you send to customers using an e-mail or dialog activity. 
E-mail templates can contain placeholders for content, such as e-Marketing Spots, links, unique promotion codes, and the customer's first and last name. When it is time to deliver the e-mail, the server replaces the placeholders with actual content.

To know more about how to work with e-mail templates , visit the Infocenter link

While using the email templates , we may be faced with providing custom placeholders , as per the client requirements.

Below are the steps to do so. For demonstration purposes , we would be introducing the customer's phone number as a custom placeholder attribute.

1. Customize the Management Center Open-laszlo files to include the new custom tag for your new custom attribute.

 File
/LOBTools/WebContent/WEB-INF/src/lzx/commerce/marketing/restricted/widgets/EmailTemplateRichTextEditor.lzx

Step 1: Modify the  open lazlo file to introduce "Customer Phone Number" in the selection dropdown.

1. Locate the text "<mktTextlistitem value="lastName" displayName="${mktMarketingResources['lastName'].string}"/>"

2. Add the below text in the next line
<mktTextlistitem value="phoneNumber" displayName="Customer Phone Number"/>

The completed code will look as follows :


Step 2: Modify the  on-click handler to insert the custom tag <e-mail:PhoneNumber /> in the editor when the user selects "Customer Phone Number" and clicks on "Insert"


1. Locate the text "<handler name="onclick">"

2. Add the below text in the function implementation
  else if(selected == "phoneNumber") {
     classroot.insertTextAtSelection("<e-mail:PhoneNumber />");
   }


The completed code will look as follows :


Step 3: Build the Open Lazlo project - LOBTools
Right Click "LOBTools" project and click on "Build OpenLaszlo Project" as show in the figure below. Restart server.
.

This concludes the Management Center customizations.


2. Introduce a Tag implementation class

1. Create a tag implementation class which would contain the logic to replace the placeholder tag <e-mail:PhoneNumber /> with actual content.

This class should implement the "com.ibm.commerce.emarketing.emailtemplate.tag.Tag" interface. Follow the link to understand the interface methods which need to be implemented.

For the pupose of this tutorial , let the fully qualified name of this class be :

'com.wcshub.commerce.emarketing.emailtemplate.tag.TagPhoneNumber

2. Make an database entry in the table TAGCLASS.
To more about this table , follow the Infocenter link.  The sample query is provided below:

 insert into tagclass values ('PhoneNumber',  'com.wcshub.commerce.emarketing.emailtemplate.tag.TagPhoneNumber' ,  'Implementation class for Phone Number Tag' , NULL  );

The tutorial is now complete. Test the customizations.

I hope you found this topic interesting and informative - Please leave your feedback comments. 

Thursday, August 9, 2012

Management Center : Increasing the Promotion Code Upload Limit

By default, the maximum file size of your CSV file or .zip is 10 MB. You can change the maximum file size.

The maximum file size limit is defined in both the Open Lazlo client and Websphere Commerce instance file.

Below are the steps required to be performed to increase the promotion code upload limit :

1. Update the client
  1. Open WebSphere Commerce Developer and switch to the Enterprise Explorer view.
  2. In the Enterprise Explorer view, expand LOBTools > WebContent > config> commerce> promotion> objectDefinitions
  3. Open the PromotionCodeImportPrimaryObjectDefinition.def file, and locate the defination name proBasePromotionCodeImportPrimaryObjectDefinition.
  4. Update the value of the maximumFileSize attribute. The default value is 10000000 bytes. You can change this value as needed, however, keep in mind the impact that larger files might have on your server.
    <PrimaryObjectDefinition copyProtected="true" creatable="true" definitionName="proBasePromotionCodeImportPrimaryObjectDefinition" displayName="${promotionResources.promotionCodeImportObjectName}" displayNameProperty="fileName" fileNamePropertyName="fileName" fileSizePropertyName="fileSize" headerIcon="promotionCodeImportHeaderIcon" helpLink="tasks/tprimportpromo.htm" icon="promotionCodeImportIcon" idProperty="promotionCodeImportId" isBaseDefinition="true" isFileObject="true" maximumFileSize="new_size" newDisplayName="${promotionResources.promotionCodeImport_newPromotionDisplayName}" newObjectMenuItemText="${promotionResources.contextMenuNewPromotionCodeImport}" objectGroups="PromotionCodeImportGroup" propertiesDefinitionName="proPromotionCodeImportProperties" searchType="FindPromotionCodeImports" writeUsage="IBM_ManagePromotionTool"> 

    where new_size is the size you want (in bytes).
  1. Update the server.
    1. Open the Updating the WebSphere Commerce configuration file, and locate the command element for com.ibm.commerce.promotion.commands.CreatePromotionCodeImportCmd name.
    2. Change the value of the maxuploadsize attribute to match the value specified for the client.
    3. Run the ANT target: UpdateEAR target to update the runtime configuration with the master configuration file.
After you complete your customization:
  1. Right-click LOBTools Project; then click Build OpenLaszlo Project to produce an updated ManagementCenter.swf file under the workspace_dir\LOBTools\WebContent directory. This setting is the default environment setting.
  2. Test your changes by viewing them in the Management Center, using this URL: https://hostname:8000/lobtools.
  3. Deploy your changes to your production environment.

Saturday, March 17, 2012

Search Term Associations

Search term associations suggest additional, different, or replacement products in search results. They can also link search terms to a selected landing page in the store. Search term associations are used as a product recommendation strategy to increase store sales when customers search for products, as the search submission is modified to increase or target search results.

What are some examples of search term associations?

Here are some examples of search term association activities that Product and Catalog Managers can create using the Catalog tool:
  • If a shopper searches the store for a laptop, you can define synonyms to include similar products in the search, such as notebook, netbook, or computer, to potentially increase the amount of search results that are returned. In this example, the search results include those for laptop, plus the search results for the notebook, netbook, or computer synonyms. This is helpful, for example, if your store sells many types of laptop computers.
  • If a shopper searches the store for a laptop, you can define replacement terms such as computer or desktop to modify the potential search results. In this example, the search results include the search results for the computer or desktop search terms, while optionally ignoring the original laptop search term. This is helpful, for example, if your store does not sell laptop computers, but does sell desktop computers.
  • If a shopper searches for a laptop, you can define the resulting landing page as a custom store page, showcasing a particular brand's laptop computers or other related products. Landing pages can also be used to promote certain activities in the store. For example, if a shopper searches the store for wish list, you can define the resulting landing page as the My Account: Personal Wish List page.

What are the benefits of search term associations?

WebSphere Commerce search, which includes support for search term associations, provides the following key business benefits:
  • Integrated search management tooling for business users in the Management Center, allowing business users to leverage site search behavior and other Precision Marketing triggers to offer product recommendations and promotions.
  • Use as a product recommendation strategy to increase store sales.

Which user roles use search term associations?

WebSphere Commerce search capabilities are easily leveraged by the following user roles:
  • Marketing Managers who want to define business rules to support various search functionality and influence search results for product merchandising to increase conversion rates.
  • Catalog and Product Managers who want to proactively influence search results and integrate search with merchandising and marketing.
 Demo
Infocenter Link : http://publib.boulder.ibm.com/infocenter/wchelp/v7r0m0/topic/com.ibm.commerce.admin.doc/concepts/cwnsearchtermassoc.htm
 

Sunday, March 4, 2012

Enabling WC Search

Enabling WC Search for Extended Sites for Developer Environment (Derby Database)
Step 1: Ensure that the site is configured to support the Management Center marketing features
Follow the steps out-lined in the below link-
Step 2: Install Feature Pack 2 or higher
Step 3: Enable Starter Stores Enhancements
Important Note: If you are enabling starter store enhancements in the WebSphere Commerce development environment, the default configuration includes a Derby database with all base, non feature pack, starter stores, including the Madisons starter store, prepublished. If you require a feature pack version of a starter store, publish the feature pack version using a different store name. You can create a new database without the pre-published stores or restore to a clean bootstrap Derby database then publish the feature pack version of the starter store. Also when configuring the WebSphere Commerce development environment you can select to a new bootstrap Derby database without the prepublished starter stores.
1.       Run the enablement script. Running the starter store enhancements enablement script also enables the Management Center feature. That is, if the Management Center feature is currently disabled, it is enabled after running the starter store enhancements enablement script.
enableFeature.bat -DfeatureName=store-enhancements
2.       If the script runs successfully, the message enableFeature.bat completed is displayed in the command window. For enablement details, see the WCDE_installdir\logs\enableFeature.log file.
3.       Republish the application
Step 4: Publish the Madisons enhancements store archive
1.       Open the Administration Console, selecting the Site option.

2.       From the Store Archives menu, select Publish. The Store Archives page displays listing the store archives available for publish. By default, the page displaying composite store archives displays.
Before publishing the 
MadisonsEnhancements.sar , make sure to publish the Madions-FEP.sar . The MadisonsEnhancements.sar. does not work properly with the Madisons.sar file and publish the same without prior publishing the version FEP will cause OOM since the Apache SOLR engine starts indexing for all languages.
-

3.       From the View list, select Add On Feature.
4.       Select MadisonsEnhancements.sar.
5.       Click Next.
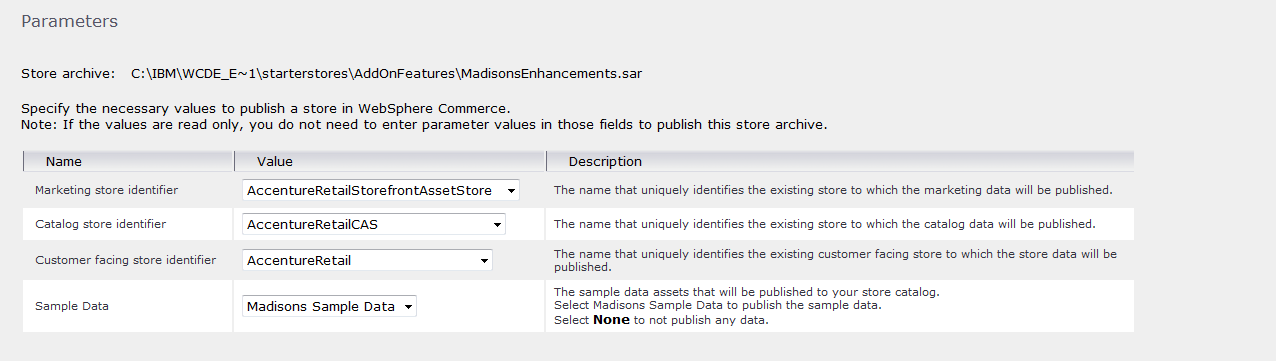
6.       Select the Madisons-based starter store onto which you want to publish the Madisons enhancements store archive. The Publish wizard must publish the Madisons enhancements store archive on top of the Madisons starter store; no other starter stores are supported. There are three stores:
    1. Marketing store
    2. Catalog store
    3. Customer facing store
    4. If you are using a single store setup then choose the same store for all three.
    5. If you are using an Extended sites model, choose the appropriate stores that you are using.


7.       Click Next. The Summary page displays, listing the store archive and parameters selected, and the location to which the store archive is published.

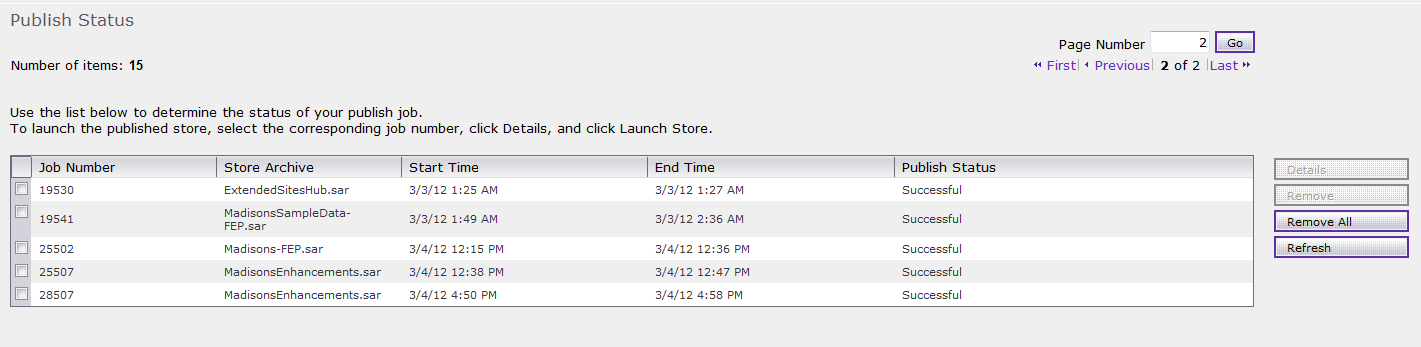
8.       After reviewing the summary information, click Finish. A confirmation dialog displays, telling you the number of the publishing job. Note the job number for future reference.
9.       To check the publishing status, click Refresh.
10.   When the Publish Status column displays Successful, select the corresponding job number; then click Details.

11.   To launch the published store in a browser, click Launch Store.
12.   When you have finished viewing the store, bookmark the site, and close the browser.
13.   Restart the WebSphere Commerce Server.
Step 5: Enable the search-based navigation store function

Step 6: Ensure that your search server and index structure is deployed and built.
1.       Deploying the WebSphere Commerce search server locally (standard deployment mode)
The deployment option for the Developer is “Embedded”.
a.       Ensure that the test server is stopped and that Rational Application Developer is not running.
b.      Open command prompt and navigate to the following directory - WCDE_installdir\bin
c.       Execute the below command and ensure it runs successfully –
enableFeature.bat -DfeatureName=foundation
d.      Test your search deployment by navigating to the following URL
http://localhost/solr/Default/select?q=*%3A*
e.      If successful, you should receive a response resembling the following snippet:
<response>
<lst name="responseHeader">
<int name="status">0</int>
<int name="QTime">140</int>
<lst name="params">
<str name="q">*:*</str>
</lst>
</lst>
<result name="response" numFound="0" start="0"/>
</response>
2.       Set up the WebSphere Commerce search index structure for a specific master catalog locally
a.       Ensure that the test server is stopped.
b.      Find out the cataloged for the Master Catalog. The same sample queries are provided below for the extended sites. Please note value returned in each step is used in the next query.
select storeent_id from storeent where IDENTIFIER='MyStoreRetail';--11101
select relatedstore_id from storerel where store_id=11101 and streltyp_id=-4 and relatedstore_id not in (11101); --11001
select catalog_id from storecat where storeent_id=11001 and mastercatalog='1'; --10351
c.       Navigate to the path - WCDE_installdir\components\foundation\subcomponents\search\bin
d.      Execute the following command –
setupSearchIndex.bat -masterCatalogId 10351 -dbname "WCDE_installdir\db\mall"
e.      Ensure that the utility runs successfully.
Consult the following table for the utility results:
Results
Description
Search index setup successfully completed without errors.
The utility ran successfully.
Search index setup successfully completed with warnings. Check the log file for more information.
The utility ran successfully but with warnings. Some warnings might be generated during the setup index process, however, they might not be important such as the utility skipping existing cores that have already been previously created.
Search index setup successfully completed with errors. Check the log file for more information.
The utility ran successfully but with errors. The job has not completely finished setup, and the log files should be checked to see where the problem occurred.
Search index setup not successful. An unrecoverable error has occurred. Check the log file for more information.
The utility did not run successfully. The log files should be checked to see where the problem occurred.
You can find the log file in the following location:
WC_installdir/components/foundation/subcomponents/search/log/wc-search-index-setup.log
f.        Restart the WebSphere Commerce search server.

3.       Preprocess the WebSphere Commerce search index data

You can preprocess the search index data to prepare your WebSphere Commerce data for indexing. The preprocess utility extracts and flattens WebSphere Commerce data and then outputs the data into a set of temporary tables inside the WebSphere Commerce database. The data in the temporary tables is from the base schema and is then used by the index building utility to populate the data into Solr indexes using Solr's Data Import Handler (DIH).
a.       Ensure that the test server is stopped.
b.      Navigate to the path WCDE_installdir\bin
c.       Run the preprocessing utility:
di-preprocess.bat "WCDE_installdir\search\pre-processConfig\MC_10351\Cloudscape" -localename en_US
d.      Ensure that the utility runs successfully.
e.      Verify that the output from the script contains no errors and that the last part of the output contains the following lines:
"Program exiting with exit code: 0.Data import pre-processing completed successfully with no errors."
Also, inspect the following file for errors: WCDE_installdir\logs\wc-dataimport-preprocess.log
4.       Build the WebSphere Commerce search index

You can build the WebSphere Commerce search index using the index building utility. It is a wrapping utility that updates the information in the Master Index using the Data Import Handler (DIH) service to build the index, either partially through delta index updates or completely through full index builds. When there are multiple indexes, for example, each language using its own separate index, the index is built multiple times.
a.       Ensure that the test server is started in Rational Application Developer
b.      Restart the WebSphere Commerce search server after preprocessing is complete, and ensure you can visit Solr over HTTP, for example:
http://localhost/solr/Default/select?q=*%3A*
c.       Navigate t
d.      Run the following command –
di-buildindex.bat -masterCatalogId 10351 -localename en_US -basePath "C:\IBM\WCDE_ENT70_1\workspace\Stores\WebContent\MyStoreRetailStorefrontAssetStore\StaticContent\en_US" -storeId 11051
where, 11051 is the storied of the StoreAssetStore since I did not have store specific content.
e.      Ensure that the utility runs successfully. If the utility runs successfully, you will receive the following message in the Command window:
Data import process completed successfully with no errors.
Step 6: Create search term associations
(Product Manager) Influence search results in the store by creating new search term associations, such as synonyms or replacement terms.
Step 7: Link search terms with landing pages     
(Product Manager) Promote certain store pages by linking search terms with landing pages.
Step 8: Create search rules
(Marketing Manager) Influence search results in the store by creating search rules, such as adding or replacing search criteria, changing the search result order, or specifying the top search result.
Step 9: Preview the influenced search results in the store
(Product/Marketing Manager) Preview the newly created search term associations, landing pages, and search rules in the store search results.


Saturday, March 3, 2012

Enabling "Browsing History" in Madisons Store

My Account: Browsing history

The browsing history page displays all the products that have been viewed by the customer, so that they can keep track of their recently viewed products. Recently viewed product lists can encourage customers to purchase items they might be interested in, and helps compare those items with other similar products in the store. The number of items stored in the browsing history is configurable, and contains paging support when viewing many items in the browsing history.
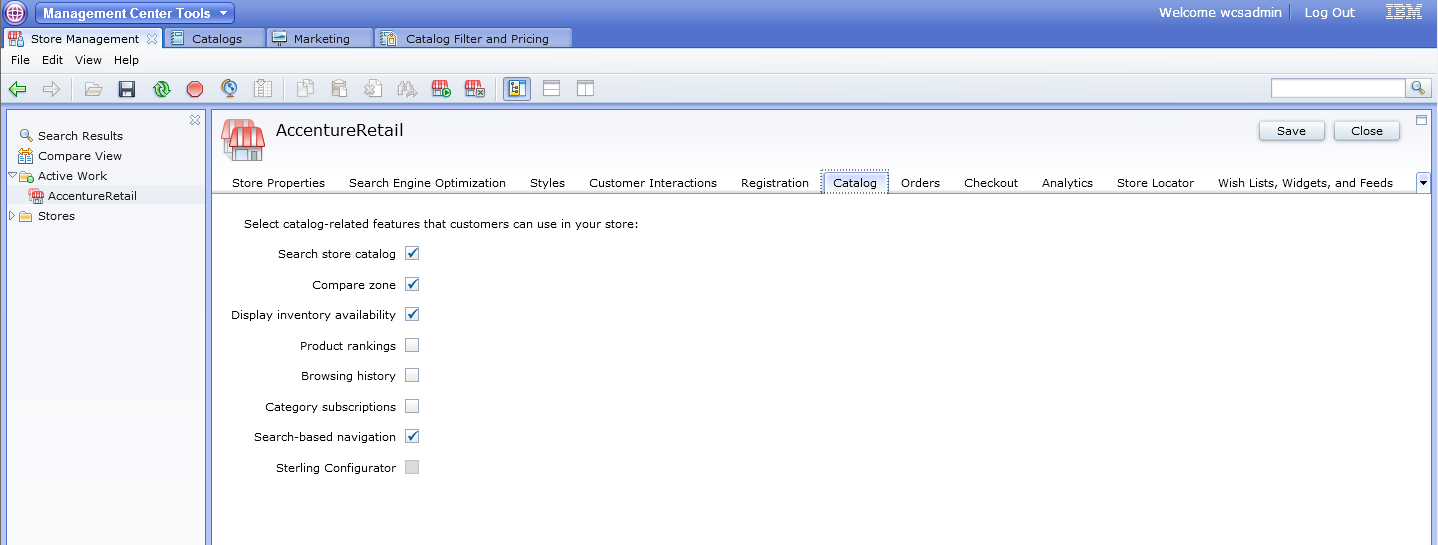
By default , you will not find the "Browsing History" link in the "My Account" page.


Step 1 : Enable the "Browsing History" link in the My Account
  1. Login to Management Center
  2. Select the "Store Management" menu and work on the Store you want to enable the feature for.
  3. Enable the "Browsing History" option as shown in the screenshot below - 
  4.   
  5. Click on "Save" and "Close" to save the changes. 
  6. Lauch the store and login to go to the "My Account" page. You will find the link appear in the My Account left navigation.
  7. Though the link is enabled , the functionality might not work. Try clicking on few products and then go the the "Browsing History" page. But you will find it blank always. Follow the next steps to complete the setup and enable the feature.
Step 2 : Enabling Management Center marketing features
 Follow the steps to enable the persistant session features , personalization id features and marketing listeners.

Step 3: Creating "BrowsingHistory" espot and "BrowsingHistoryActivity" webactivity
  1. The name of the espot is important and has to be "BrowsingHistory" only and nothing else because the AjaxBrowsingHistory.jsp expects an espot with this name only. If you want a different name , make the necessary customizations in the code base.
  2. Follow the below sample configurations to display the "viewed products"
  3. Next Step is to configure a web-activity of the type "Display Recently Viewed Products". The name of the web-activity can be anything.
  4.            
  5. Save and Activate the web-activity.
  6. Now , browse few products and return to the "Browsing History" page and you will find that your products show up. The max number of products that will show up as configured in the screenshot above.
Important Notes:
  • By default, the server stores the list of recently viewed items for the current shopping session only, for a maximum of 30 minutes. When the customer's session ends or when 30 minutes elapse, that customer's recently viewed list is lost. When the customer returns to the store for another session, the server starts a new recently viewed list. Retention of the recently viewed list is also affected by the marketing user behavior cache configuration. If you want to retain customers' recently viewed lists from one session to the next, then a developer can customize the Marketing tool to store customers' recently viewed lists in the database.
  • For the Display Recently Viewed action in a Web activity, the server stores the list of recently viewed items in the marketing user behavior cache only; the list is not stored in the database by default. When the customer's user behavior cache entry is removed from the cache, that customer's recently viewed list is lost. A customer's user behavior cache entry is removed from the cache after not being modified for 30 minutes, or it might be removed when the cache is full. The default size is 10,000 cache entries. You can configure the user behavior cache to hold more entries by increasing the size of the cache and by enabling disk offload. 
Happy Exploring! :)

Friday, March 2, 2012

Understanding the Extended Sites the easy way

Extended Sites is a widely known feature and I am sure a lot of us have done a lot of reading on the same. We know the concept theoretically but are at times unable to visualize its real power and capabilities.

While exploring more about the concept, I came across some really nice videos on youtube which I have collated below. I hope these videos will help you understand Extended Sites concepts and capabilities in just couple of minutes. It really helped me :)

Know the concept

Microsites and Subsites with IBM WebSphere Commerce


Now, lets get some hands-on

WebSphere Commerce - Extended Sites Part I


WebSphere Commerce - Extended Sites Part II


Happy Learning!

References -
IBM WCS 7 Infocenter

Bob Balfe - blog.balfes.net