Welcome to the IBM Websphere Commerce Hub


Welcome to the IBM Websphere Commerce Hub

Come join me in my journey to explore the various features and capabilities of IBM Websphere Commerce and understand how retailers can benefit from its really cool out-of-box functionality.

Showing posts with label solr. Show all posts

Thursday, May 28, 2015

RESOLVED - com.ibm.wsspi.webcontainer.util.RequestUtils parseQueryString SRVE0325E: Exceeding maximum parameters allowed per request 10,000 ,current 10,000 , cannot add more.(SOLR)

Sometimes , you may find that the SOLR Search and Browse cease to function and you may keep hitting "No Search Results". On further investigating the SOLR logs , you may find the below exceptions -


[5/26/15 11:27:08:586 BST] 00000027 SolrCore      I org.apache.solr.core.SolrCore execute [MC_10001_CatalogEntry_en_GB] webapp=/solr path=/select params={q=shortDescription:tv} hits=905 status=0 QTime=1

[5/26/15 11:27:36:127 BST] 00000027 util          E com.ibm.wsspi.webcontainer.util.RequestUtils parseQueryString SRVE0325E: Exceeding maximum parameters allowed per request 10,000 ,current 10,000 , cannot add more.

[5/26/15 11:27:36:131 BST] 00000027 SolrDispatchF E org.apache.solr.common.SolrException log java.lang.IllegalArgumentException

        at com.ibm.wsspi.webcontainer.util.RequestUtils.parseQueryString(RequestUtils.java:196)

        at com.ibm.ws.webcontainer.servlet.RequestUtils.parsePostData(RequestUtils.java:356)

        at com.ibm.ws.webcontainer.srt.SRTServletRequest.parseParameters(SRTServletRequest.java:2051)

        at com.ibm.ws.webcontainer.srt.SRTServletRequest.getParameterMap(SRTServletRequest.java:2568)

        at org.apache.solr.request.ServletSolrParams.<init>(ServletSolrParams.java:29)

        at org.apache.solr.servlet.StandardRequestParser.parseParamsAndFillStreams(SolrRequestParsers.java:394)

        at org.apache.solr.servlet.SolrRequestParsers.parse(SolrRequestParsers.java:115)

        at org.apache.solr.servlet.SolrDispatchFilter.doFilter(SolrDispatchFilter.java:223)

        at com.ibm.ws.webcontainer.filter.FilterInstanceWrapper.doFilter(FilterInstanceWrapper.java:190)

        at com.ibm.ws.webcontainer.filter.WebAppFilterChain.doFilter(WebAppFilterChain.java:125)

        at com.ibm.ws.webcontainer.filter.WebAppFilterChain._doFilter(WebAppFilterChain.java:80)

        at com.ibm.ws.webcontainer.filter.WebAppFilterManager.doFilter(WebAppFilterManager.java:908)

        at com.ibm.ws.webcontainer.servlet.ServletWrapper.handleRequest(ServletWrapper.java:935)

        at com.ibm.ws.webcontainer.servlet.ServletWrapper.handleRequest(ServletWrapper.java:503)
        at com.ibm.ws.webcontainer.servlet.ServletWrapperImpl.handleRequest

This is caused when the SOLR query string has more than 10,000 query string parameters. SOLR cannot handle that and fails with an internal server error. To resolve this issue , please follow the below steps -

1. In the administrative console click 
Servers > Application Servers > server_name > Web Container settings > Web Container 

2. Under Additional Properties select Custom Properties. And add a new 

Property name: com.ibm.ws.webcontainer.maxParamPerRequest 

Value : some number 

The default value for this is 10000. You can set it a different number or you can set this property to -1 if you do not want to limit the number of parameters that can be included in a request
 

Wednesday, May 27, 2015

WC Search Customization Points

A simple Mind map which depicts the commonly customized files/components with their purpose while extending the WC Search.


SearchPreProcessor
A query preprocessor modifies the native SolrQuery object right before it is sent to the Solr server for processing.

The custom query preprocessor needs to be mapped in the wc-search.xml.

For more details , refer to the infocenter link

SearchPostProcessor
A query postprocessor modifies the physical DataObject, SolrEntityContainerImpl, immediately after the QueryResponse is returned from the Solr server.

The custom query postprocessor needs to be mapped in the wc-search.xml

For more details , refer the infocenter link 

SearchProfile
WebSphere Commerce search uses search profiles to control the storefront search experience at a page-level. Search profiles group sets of search runtime parameters such as search index name, search index fields, expression providers and result filters, paging and sorting, and search feature configurations such as text highlighting, facets, and spelling correction. Search profiles are defined in the WebSphere Commerce search configuration file (wc-search.xml). 

For more details , refer the infocenter link 

Business Object Mediator
The business object mediator maps physical search index fields to their corresponding logical fields in the CatalogEntryView noun. Custom physical index fields can be mapped by using the UserData fields.

For more details , refer the infocenter link 

Preprocessor and Data Import Handler (DIH)
The preprocessing tasks are controlled by the wc-dataimport-preprocess XML files. The files contain table definitions, database schema metadata, and references to the Java classes used in the preprocessing steps. Those files are invoked by the di-preprocess utility, which extracts and flattens WebSphere Commerce data and then outputs the data into a set of temporary tables inside the WebSphere Commerce database. The data in the temporary tables is then used by the index building utility to populate the data into Solr indexes using Solr's Data Import Handler (DIH). 

For more details , refer the infocenter link

Search Schema
Typically, WebSphere Commerce data is stored in a relational database. In WebSphere Commerce search, another repository also stores WebSphere Commerce data. That is, the product information is stored in a search index for searching purposes. Most of the data that are stored in the search index is extracted from the relational database. Similar to the database schema, the search index also contains a schema. The fields that are defined in this schema are used by WebSphere Commerce search.
By customizing the schema.xml , we define fields in the search schema that store the data to be searched. Once the new fields are defined, the mappings must be configured for the fields to the database schema.

For more details , refer the infocenter link

I hope you will find the mindmap really useful. As always , please feel free to add your comments and suggestions.

Wednesday, November 21, 2012

WC Search Customizations - Introducing new facets

Faceted search is the dynamic clustering of items or search results into categories that let users drill into search results (or even skip searching entirely) by any value in any field. Each facet displayed also shows the number of hits within the search that match that category. Users can then “drill down” by applying specific contstraints to the search results. Faceted search is also called faceted browsing, faceted navigation, guided navigation and sometimes parametric search.


One of the common customization scenario is to introduce custom attributes as facets. The following should guide a developer through the process:

Important SOLR Configuration Files

Location : <WCDE>\search\solr\home\MC_<master_catalog_id>\en_US\CatalogEntry\conf

1. schema.xml
Introduce a child element "field" for the element "fields" for CATENTRY.FIELD1.

Place it at the end of the attributes under "Catentry's basic attributes" for logical grouping

<fields>
 <!--
   Catentry's basic attributes: map to table CATENTRY
   -->
<field name="catentry_id" type="long" indexed="true" stored="true" required="true" multiValued="false"/>
.
.
<field name="catenttype_id_ntk_cs" type="wc_keywordText" indexed="true" stored="true"  multiValued="false"/> 
 <field name="field1" type="long" indexed="true" stored="true" multiValued="false"/>

where ,
indexed: true if this field should be indexed (searchable or sortable)
stored: true if this field should be retrievable

multiValued: true if this field may contain multiple values per document

2. wc-data-config.xml
We will update the queries that are used to populate the Solr index from the WebSphere Commerce database tables. Each query needs to retrieve the data stored in field1 of the CATENTRY table.The wc-data-config.xml file loads catalog entry data in three separate parts. Product data is loaded first. This is followed by bundle data and finally all other catalog entry types. For each of the three sections there is a query for populating the full index and another query for delta updates. For each section (product, bundle and other), we need to update the two queries and then add a new field element to assign the data from the WebSphere Commerce database to the field1 field in the Solr index. All together there are nine updates you need to make to this file.

The modified file can be downloaded from here. Search "FIELD1" in the downloaded file to know the modifications required.


Important Database Tables
SRCHATTR

SQL updates required

insert into srchattr (srchattr_id, indexscope, indextype, identifier) values ((select max(srchattr_id)+1 from srchattr ) , '0', 'CatalogEntry','_cat.Field1');

insert into srchattrprop (srchattr_id, propertyname, propertyvalue)
values ((select max(srchattr_id) from srchattr ),'facet','field1');

Here , propertyvalue ' field1' is the name specified in the schema.xml

Also, srchattr_id should match in both the above queries

Code File Changes


1. SearchFacetsDisplay.jspf
Location : /Stores/WebContent/Madisons/Snippets/ReusableObjects/
This JSP fragment loops through the available global facets and includes another JSP fragment to display each facet’s data.We will introduce code to display the facet data for field1 in the left sidebar.

Search for the below <c:otherwise> tag and introdule the below code before the tag:

<c:when test="${facetField.value eq 'field1'}">
         <%@ include file="../../Snippets/Search/Field1FacetDisplay.jspf" %>
         <c:set var="f" value="${f + 1}" />                   
</c:when>

We will create  "Field1FacetDisplay.jspf" in the next step.

2. Field1FacetDisplay.jspf
Download the file from here and place it in the location "/Stores/WebContent/Madisons/Snippets/Search/".

Republish and Test!

Demo Video
Coming shortly

Sunday, March 4, 2012

Enabling WC Search

Enabling WC Search for Extended Sites for Developer Environment (Derby Database)
Step 1: Ensure that the site is configured to support the Management Center marketing features
Follow the steps out-lined in the below link-
Step 2: Install Feature Pack 2 or higher
Step 3: Enable Starter Stores Enhancements
Important Note: If you are enabling starter store enhancements in the WebSphere Commerce development environment, the default configuration includes a Derby database with all base, non feature pack, starter stores, including the Madisons starter store, prepublished. If you require a feature pack version of a starter store, publish the feature pack version using a different store name. You can create a new database without the pre-published stores or restore to a clean bootstrap Derby database then publish the feature pack version of the starter store. Also when configuring the WebSphere Commerce development environment you can select to a new bootstrap Derby database without the prepublished starter stores.
1.       Run the enablement script. Running the starter store enhancements enablement script also enables the Management Center feature. That is, if the Management Center feature is currently disabled, it is enabled after running the starter store enhancements enablement script.
enableFeature.bat -DfeatureName=store-enhancements
2.       If the script runs successfully, the message enableFeature.bat completed is displayed in the command window. For enablement details, see the WCDE_installdir\logs\enableFeature.log file.
3.       Republish the application
Step 4: Publish the Madisons enhancements store archive
1.       Open the Administration Console, selecting the Site option.

2.       From the Store Archives menu, select Publish. The Store Archives page displays listing the store archives available for publish. By default, the page displaying composite store archives displays.
Before publishing the 
MadisonsEnhancements.sar , make sure to publish the Madions-FEP.sar . The MadisonsEnhancements.sar. does not work properly with the Madisons.sar file and publish the same without prior publishing the version FEP will cause OOM since the Apache SOLR engine starts indexing for all languages.
-

3.       From the View list, select Add On Feature.
4.       Select MadisonsEnhancements.sar.
5.       Click Next.
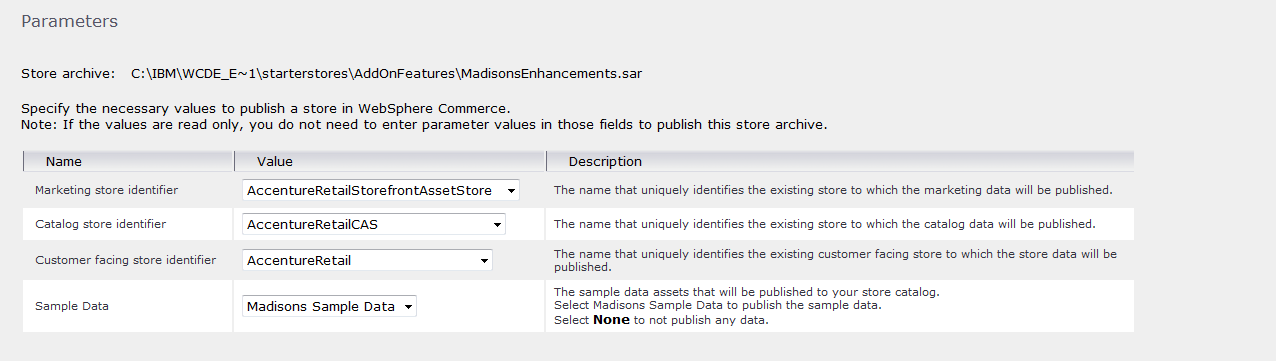
6.       Select the Madisons-based starter store onto which you want to publish the Madisons enhancements store archive. The Publish wizard must publish the Madisons enhancements store archive on top of the Madisons starter store; no other starter stores are supported. There are three stores:
    1. Marketing store
    2. Catalog store
    3. Customer facing store
    4. If you are using a single store setup then choose the same store for all three.
    5. If you are using an Extended sites model, choose the appropriate stores that you are using.


7.       Click Next. The Summary page displays, listing the store archive and parameters selected, and the location to which the store archive is published.

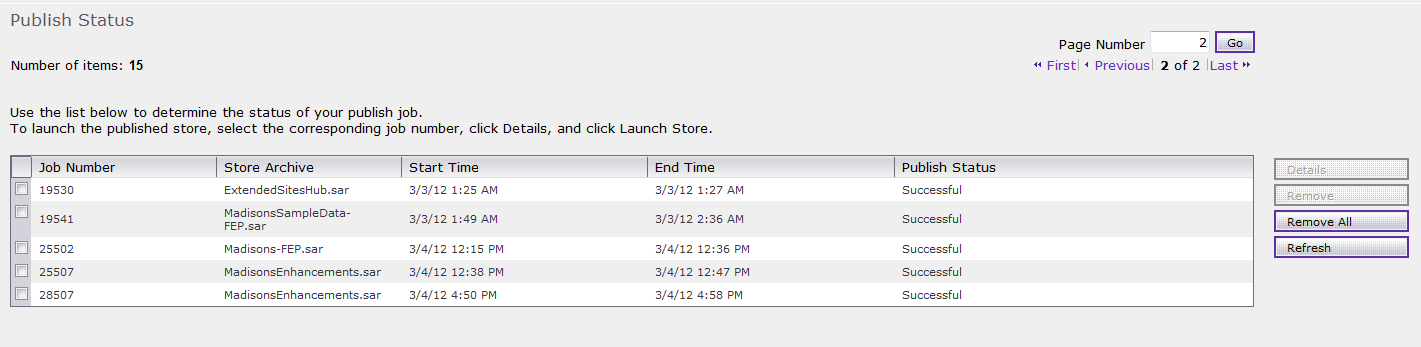
8.       After reviewing the summary information, click Finish. A confirmation dialog displays, telling you the number of the publishing job. Note the job number for future reference.
9.       To check the publishing status, click Refresh.
10.   When the Publish Status column displays Successful, select the corresponding job number; then click Details.

11.   To launch the published store in a browser, click Launch Store.
12.   When you have finished viewing the store, bookmark the site, and close the browser.
13.   Restart the WebSphere Commerce Server.
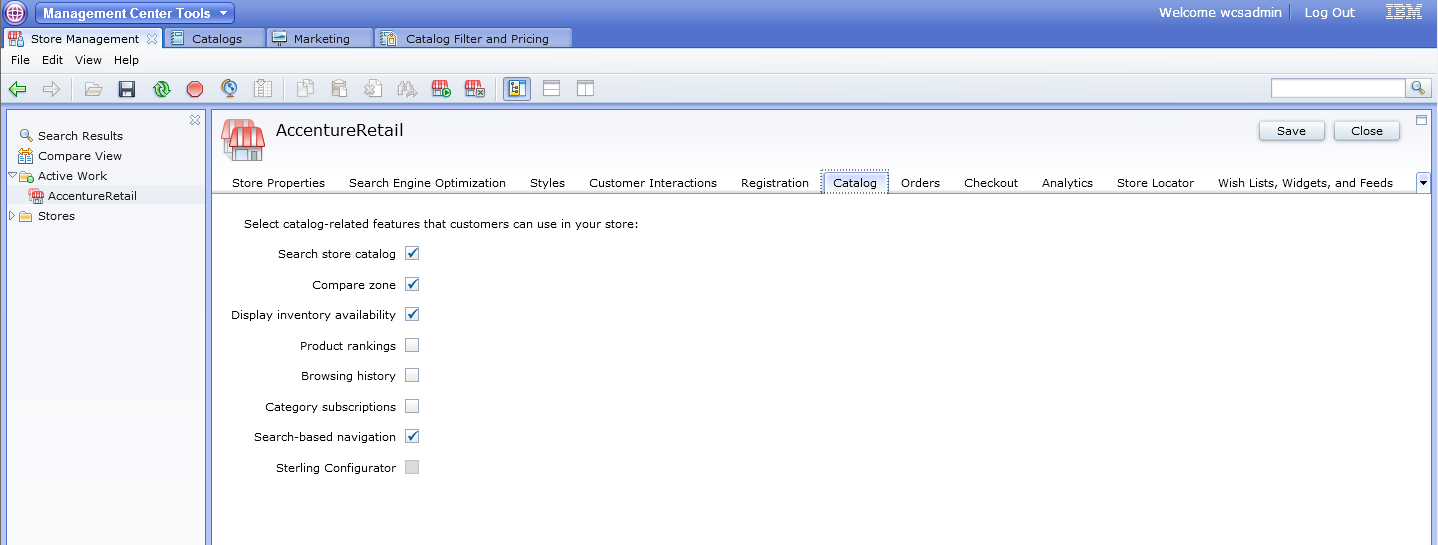
Step 5: Enable the search-based navigation store function

Step 6: Ensure that your search server and index structure is deployed and built.
1.       Deploying the WebSphere Commerce search server locally (standard deployment mode)
The deployment option for the Developer is “Embedded”.
a.       Ensure that the test server is stopped and that Rational Application Developer is not running.
b.      Open command prompt and navigate to the following directory - WCDE_installdir\bin
c.       Execute the below command and ensure it runs successfully –
enableFeature.bat -DfeatureName=foundation
d.      Test your search deployment by navigating to the following URL
http://localhost/solr/Default/select?q=*%3A*
e.      If successful, you should receive a response resembling the following snippet:
<response>
<lst name="responseHeader">
<int name="status">0</int>
<int name="QTime">140</int>
<lst name="params">
<str name="q">*:*</str>
</lst>
</lst>
<result name="response" numFound="0" start="0"/>
</response>
2.       Set up the WebSphere Commerce search index structure for a specific master catalog locally
a.       Ensure that the test server is stopped.
b.      Find out the cataloged for the Master Catalog. The same sample queries are provided below for the extended sites. Please note value returned in each step is used in the next query.
select storeent_id from storeent where IDENTIFIER='MyStoreRetail';--11101
select relatedstore_id from storerel where store_id=11101 and streltyp_id=-4 and relatedstore_id not in (11101); --11001
select catalog_id from storecat where storeent_id=11001 and mastercatalog='1'; --10351
c.       Navigate to the path - WCDE_installdir\components\foundation\subcomponents\search\bin
d.      Execute the following command –
setupSearchIndex.bat -masterCatalogId 10351 -dbname "WCDE_installdir\db\mall"
e.      Ensure that the utility runs successfully.
Consult the following table for the utility results:
Results
Description
Search index setup successfully completed without errors.
The utility ran successfully.
Search index setup successfully completed with warnings. Check the log file for more information.
The utility ran successfully but with warnings. Some warnings might be generated during the setup index process, however, they might not be important such as the utility skipping existing cores that have already been previously created.
Search index setup successfully completed with errors. Check the log file for more information.
The utility ran successfully but with errors. The job has not completely finished setup, and the log files should be checked to see where the problem occurred.
Search index setup not successful. An unrecoverable error has occurred. Check the log file for more information.
The utility did not run successfully. The log files should be checked to see where the problem occurred.
You can find the log file in the following location:
WC_installdir/components/foundation/subcomponents/search/log/wc-search-index-setup.log
f.        Restart the WebSphere Commerce search server.

3.       Preprocess the WebSphere Commerce search index data

You can preprocess the search index data to prepare your WebSphere Commerce data for indexing. The preprocess utility extracts and flattens WebSphere Commerce data and then outputs the data into a set of temporary tables inside the WebSphere Commerce database. The data in the temporary tables is from the base schema and is then used by the index building utility to populate the data into Solr indexes using Solr's Data Import Handler (DIH).
a.       Ensure that the test server is stopped.
b.      Navigate to the path WCDE_installdir\bin
c.       Run the preprocessing utility:
di-preprocess.bat "WCDE_installdir\search\pre-processConfig\MC_10351\Cloudscape" -localename en_US
d.      Ensure that the utility runs successfully.
e.      Verify that the output from the script contains no errors and that the last part of the output contains the following lines:
"Program exiting with exit code: 0.Data import pre-processing completed successfully with no errors."
Also, inspect the following file for errors: WCDE_installdir\logs\wc-dataimport-preprocess.log
4.       Build the WebSphere Commerce search index

You can build the WebSphere Commerce search index using the index building utility. It is a wrapping utility that updates the information in the Master Index using the Data Import Handler (DIH) service to build the index, either partially through delta index updates or completely through full index builds. When there are multiple indexes, for example, each language using its own separate index, the index is built multiple times.
a.       Ensure that the test server is started in Rational Application Developer
b.      Restart the WebSphere Commerce search server after preprocessing is complete, and ensure you can visit Solr over HTTP, for example:
http://localhost/solr/Default/select?q=*%3A*
c.       Navigate t
d.      Run the following command –
di-buildindex.bat -masterCatalogId 10351 -localename en_US -basePath "C:\IBM\WCDE_ENT70_1\workspace\Stores\WebContent\MyStoreRetailStorefrontAssetStore\StaticContent\en_US" -storeId 11051
where, 11051 is the storied of the StoreAssetStore since I did not have store specific content.
e.      Ensure that the utility runs successfully. If the utility runs successfully, you will receive the following message in the Command window:
Data import process completed successfully with no errors.
Step 6: Create search term associations
(Product Manager) Influence search results in the store by creating new search term associations, such as synonyms or replacement terms.
Step 7: Link search terms with landing pages     
(Product Manager) Promote certain store pages by linking search terms with landing pages.
Step 8: Create search rules
(Marketing Manager) Influence search results in the store by creating search rules, such as adding or replacing search criteria, changing the search result order, or specifying the top search result.
Step 9: Preview the influenced search results in the store
(Product/Marketing Manager) Preview the newly created search term associations, landing pages, and search rules in the store search results.